S50/S52 timing chain tensioner installation
Here are step by step instructions for changing the timing chain tensioner on the E30 M3. The part(s) being used here are standard equipment on both the US S50 3.0L (all years) and Euro S52 3.2L (from 1/96 on) E36 M3 engines. This tensioner incorporates a dual-piston design using an internal preloaded spring and provides constant chain tension. This prevents the chronic startup rattle or "dieseling" commonly heard from nearly all S14 engines. Unfortunately, if you ask your local garage mechanic about this noise you will get the standard "They all do that" answer, which is is simply unacceptable to me. Will your engine continue to work properly with the original OEM tensioner? Most likely. However, I derive peace of mind from silencing this chronic and "expensive noise" emanating from my S14.
Parts
Tensioner: ...... ...11 31 1 405 081
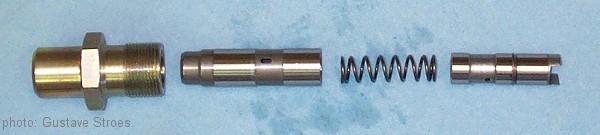
Metal Seal Ring: .07 11 9 963 418The tensioner itself is 4 pieces - a threaded housing cylinder, two pistons and an internal spring.
Tools
Degreaser (Simple Green or the like)
Shop rags
19mm deep socket / wrench
32mm deep socket / wrench
Torque wrench (ft/lbs)
Replacement engine oil (if needed)
Installation
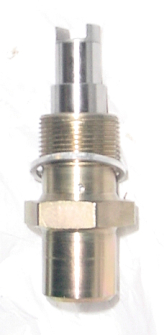
NOTE: Based on personal experience and comments from others, the tensioner often arrives with the second piston separated from the secondary cylinder (as pictured at left). Evidently dropping or hitting the tensioner on a hard object during the shipping/handling process can pop the circlip loose so that the second piston is pushed out by the spring. Before installation of your new tensioner, you must carefully push the tensioner together on the work bench or in a vice with wood blocks or other protective barrier and push the circlip back into the secondary cylinder with the aid of a small flat-tip screwdriver. This will put the tensioner back to it's original "pre-loaded" position for easy installation. The tensioner pictured below and to the right is properly pre-loaded and ready for installation.
.....
This procedure is most comfortably done with a cold engine, but hey, they're your fingers!
Working from underneath with the car on a lift or jackstands:
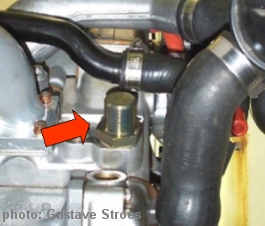
1. Once the car is raised, locate the tensioner on the passenger side of the cylinder head. It is above the A/C compressor just in front of the exhaust header. Use some Simple Green (or your favorite degreaser) with a rag clean the area around the tensioner.
2. Remove the stock tensioner assembly. The Original design has 3 different parts that bolt together. At the end is a small nipple, a middle section (19mm) and then the section which threads into the block (32mm). Use a deep 19 mm deep socket/wrench and fit it over the middle section of the tensioner assembly to break the torque on this piece and unthread the part(s). Be sure to have rags handy to catch any residual oil that leaks out. There shouldn't be more than a few drops. Use a 32mm socket/wrench to remove the last section that bolts into the block.
3. Install the new tensioner. Take the main assembly and fit the metal seal ring over the threaded section of the cap so it rests at the base. Guide the entire assembly into the opening in the cylinder block. Ensure that the groove at the end of the tensioner goes in vertically so that it mates to the tensioner rail inside the engine. It does not matter which side of the piston faces up. There is no reference mark on this new tensioner as there was with the original one. Thread the cap in gently by hand. You should be about to thread the assembly in almost entirely by hand. If you can't thread it in then the groove on the end of the piston must have slipped into the horizontal position. Once everything fits and is hand-tight, use a 32mm socket with a torque wrench and torque it o 29 ft/lbs (as per BMW factory spec).
4. Lower the car and start it up! The chain may rattle for a few seconds but that should be the end of it forever. If it rattles again, shut off the engine and remove the tensioner assembly. Inspect the piston movement of the cylinder and placement of the grooved end. Try to work the piston action by hand several times, check groove alignment, reinstall and restart.
Don't forget to check your oil level if you encountered any oil spillage during this process.
.....
Original tensioner ......................................................New tensioner
Working in the driveway from the top of the engine compartment: (same as above save for steps 1 and 6)
1. Remove the windshield washer fluid tank located on the right side of the engine compartment. Be prepared for any washer fluid spillage!
2. From the top, locate the tensioner on the passenger side of the cylinder head. It is above the A/C compressor just in front of the exhaust header. Use some Simple Green (or your favorite degreaser) with a rag clean the area around the tensioner.
3. Remove the stock tensioner assembly. The Original design has 3 different parts that bolt together. At the end is a small nipple, a middle section (19mm) and then the section which threads into the block (32mm). Use a deep 19 mm deep socket/wrench and fit it over the middle section of the tensioner assembly to break the torque on this piece and unthread the part(s). Be sure to have rags/kitty litter handy to catch any residual oil that leaks out. There shouldn't be more than a few drops. Use a 32mm socket/wrench to remove the last section that bolts into the block.
4. Install the new tensioner. Take the main assembly and fit the metal seal ring over the threaded section of the cap so it rests at the base. Guide the entire assembly into the opening in the cylinder block. Ensure that the groove at the end of the tensioner goes in vertically so that it mates to the tensioner rail inside the engine. It does not matter which side of the piston faces up. There is no reference mark on this new tensioner as there was with the original one. Thread the cap in gently by hand. You should be about to thread the assembly in almost entirely by hand. If you can't thread it in then the groove on the end of the piston must have slipped into the horizontal position. Once everything fits and is hand-tight, use a 32mm socket with a torque wrench and torque it o 29 ft/lbs (as per BMW factory spec).
5. Lower the car and start it up! The chain may rattle for a few seconds but that should be the end of it forever. If it rattles again, shut off the engine and remove the tensioner assembly. Inspect the piston movement of the cylinder and placement of the grooved end. Try to work the piston action by hand several times, check groove alignment, reinstall and restart.
6. Replace the windshield washing fluid tank and you're done.
Don't forget to check your oil level if you encountered any oil spillage during this process.
This is about a 10 - 15 minute job from underneath the car, and 20 - 30 minute job from above, provided everything goes well.
Thanks to Gustave Stroes, Chris (C///MR) and Karim from Germany for their contributions!
Bay Area ///Motorsport
2000-2003